How to set up automations using Zigbee2MQTT extensions
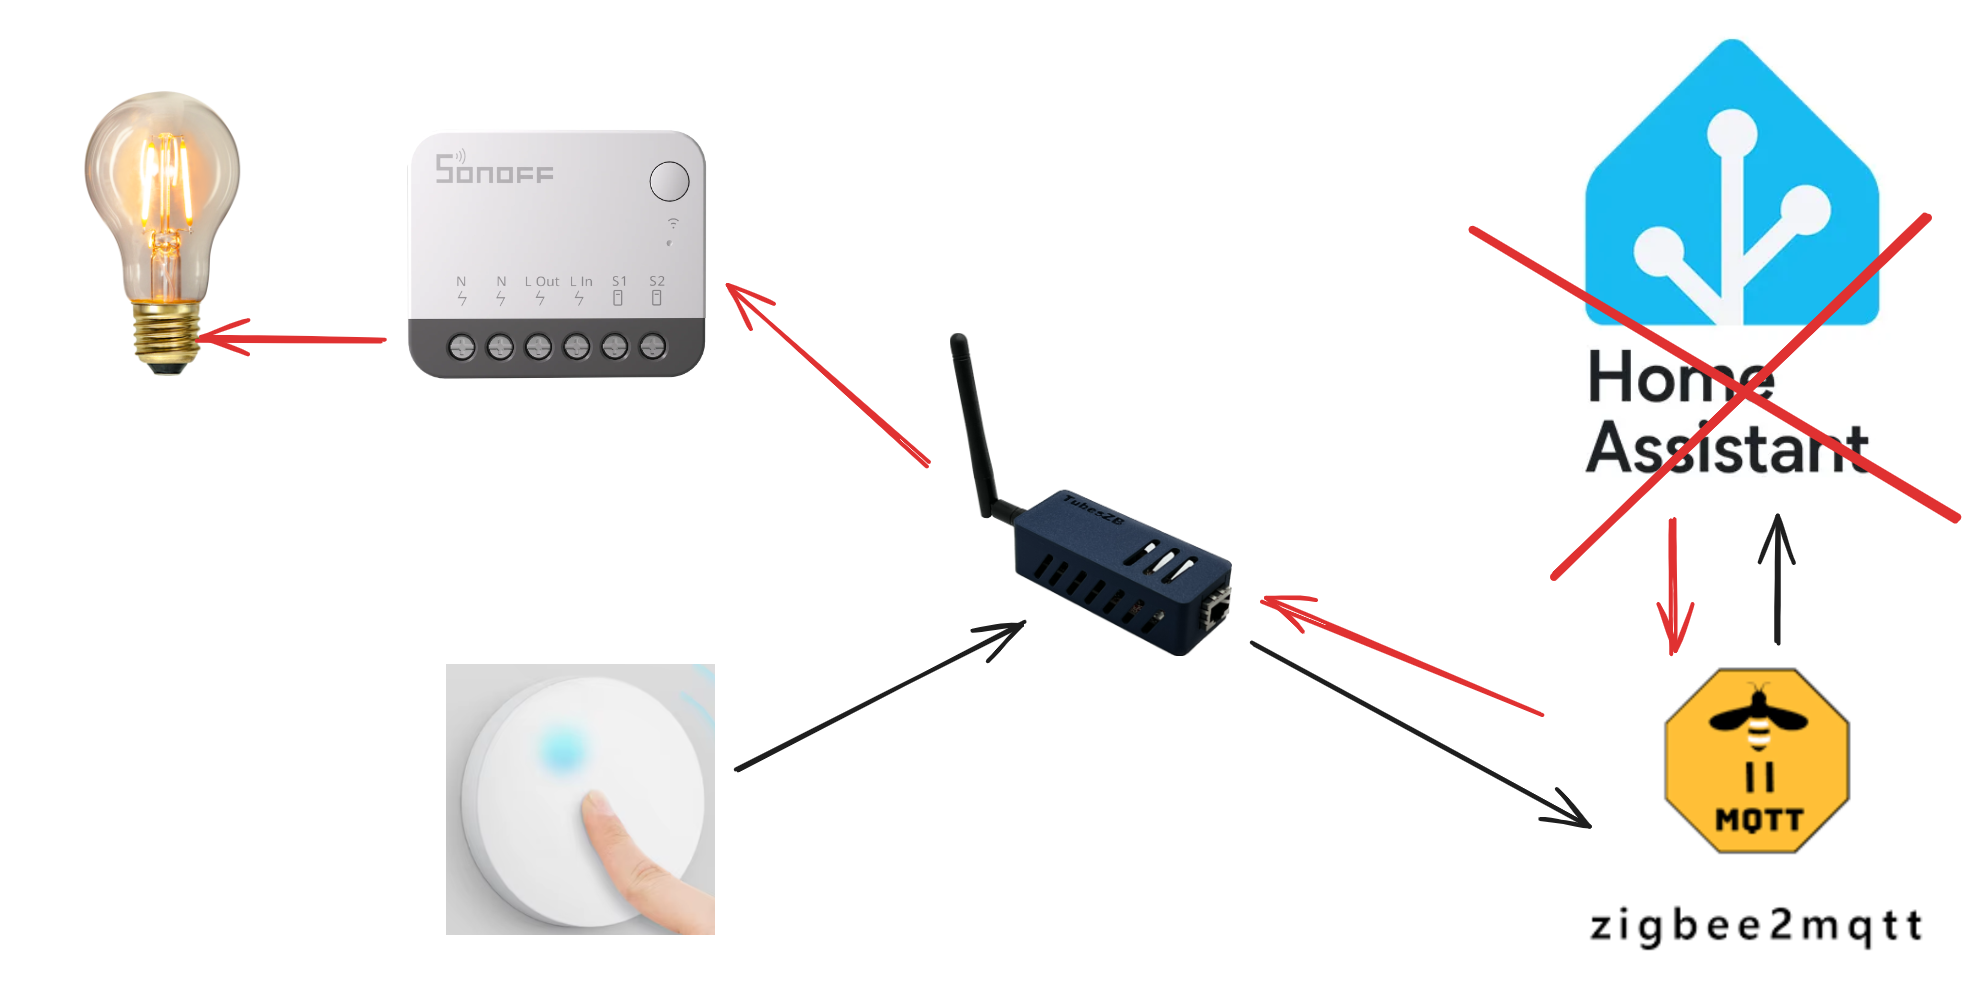
Table of Contents
Building up home automation is so much fun until your family starts to complain because something “doesn’t work again”. The list of reasons why it periodically happens can be quite long but there are some key components that should work 100% of time, like Zigbee network and basic automations built on top of it.
Switching light using smart buttons is quite a common scenario in home automation and, probably, the first “automation” every enthusiast configures after setting up their smart home. A pitfall here is that once you configured the light like this, you can’t afford it stopping working even for a moment.
In other words, that means that Zigbee network and some set of basic automations are now the critical infrastructure of the house and should have appropriate 99.9+% of the uptime. Nothing is more entertaining than to see how home automation enthusiasts demonstrate how they have automated something while jumping around a smart button, that doesn’t seem to work, and frantically opening the app to check what is going on.

As opposed to the circuit switch, which directly controls the lamp, smart light control loop is quite long. If you have, like me, Zigbee2MQTT + Home Assistant tech stack, it is going to look something like this:

Take a look once again and notice the path for the command signal before it reaches the switch. If we want the system to be more resilient we need to try to reduce the number of hop-ons in the control loop as much as possible.
Zigbee binding
First thing that we should explore is the, so called, Zigbee binding, which allows direct communication between devices skipping the coordinator. There are two types of binding:
- Devices grouping, which allows controlling multiple Zigbee devices with a single command, i.e. changing brightness of n smart bulbs with a single message emitted.
- Endpoint to endpoint binding, making a device sending direct messages to another device or group on a state change. Both are very handy and can help to increase the resilience of the network during coordinator downtimes, improve end-2-end latency and overall stability of the system.

As the result, once configured, devices can exchange information about their state changes and act accordingly even if the coordinator is down.
Zigbee2MQTT supports both grouping and endpoint to endpoint binding, and provides an intuitive user interface for configuration. Check out official documentation and this blog post, which has quite detailed step by step guide.
Nevertheless, despite obvious advantages of endpoint to endpoint binding, it involves a whole set of not so obvious disadvantages. Some of them are:
- It is quite common that the device doesn’t have a proper implementation of binding functionality, or even has no binding functionality at all.
- Troubleshooting is extremely difficult since all communication happens at a low level between devices. In the worst-case scenario, you might need to buy another Zigbee coordinator to sniff and analyse the network traffic.
- The device won’t send broadcast-type messages for this endpoint anymore, which means the coordinator won’t receive status updates! As a workaround, the coordinator must also be bound to the device, so that the device sends updates to both the target device and the coordinator.
- It is possible to configure the simplest use cases only.
Having realised all these drawbacks, I understood that this was not an option for me — at least not for now.
Zigbee2MQTT Extensions
Another option that I was exploring ‘upstream’ in the above diagram is to configure these simple automations directly in Zigbee2MQTT using its external extensions. In short, these are simple JavaScript callbacks that can be registered to execute custom code in response to different events, such as the receipt of a device or MQTT message. You can also get access to the current state of each device and the settings of the service.

It is worth noting that the goal here is not to replicate or replace Home Assistant automations. Instead, the goal is to build the basics, for which latency and stability matter the most. In such a simple case as a button click toggling the light, we don’t really need Home Assistant in the loop.
Another concern is that this solution does not completely address the resilience issue – the coordinator and Zigbee2MQTT remain a single point of failure. This could be resolved by moving Zigbee2MQTT to separate hardware. Due to its lightweight nature, it should be possible to use a Raspberry Pi Zero-type SBC with battery reserve power without any performance impact. So far, Zigbee2MQTT has proven to be a stable and reliable piece of software that requires infrequent upgrades.
Why choose extensions over Zigbee binding?
While Zigbee binding sounds perfect on paper (devices talk directly!), in practice it’s a headache. Here’s what swayed me toward extensions:
What you gain:
- You can actually debug what’s happening via logs and the web UI
- Works with any Zigbee device, even cheapo ones with broken binding implementations
- Room to grow — add conditions, timers, or multi-step logic later
- Configuration is just JavaScript, not mysterious device-level settings
What you give up:
- Still depends on the coordinator being up (though you can mitigate this with dedicated hardware with reserve battery power)
- Slightly higher latency from extra processing hops
Why not just use Home Assistant?
If you already have Home Assistant, why bother with extensions? Because your family doesn’t care about your dashboards when the lights won’t turn on.
What extensions get you:
- Lights respond faster — fewer components in the chain
- One less thing that can break — HA can restart without killing basic lighting
- Less overhead — no automation engine overkill and Zigbee2MQTT spends minimal time to update entity states
The tradeoff:
- You need basic JavaScript knowledge (though copy-paste gets you far)
- No visual automation builder
- Debugging means reading logs, not clicking through a UI
Think of it this way: Home Assistant is for the cool stuff (scenes, schedules, presence detection). Extensions are for the stuff that must work, like turning on the hallway light at 3am.
Configuration
In my case I wanted to configure a simplest automation to trigger corridor lights on click on a smart button. Let’s go step by step on how to do that.
Device IEEE Addresses
Before we jump in on extension configuration, we first need to note so called IEEE Addresses of our smart button and smart switch. I assume that devices are paired already and visible on the main page of Zigbee2MQTT web interface.

Note them somewhere because we are going to use them to filter incoming events and send state change events.
Corridor lights extension
External Extensions in fact are simple JavaScript files stored in the external_extentions of Zigbee2MQTT data directory, which enable us to define custom behavior based on events.
Zigbee2MQTT provides a useful web interface for developing extensions, offering syntax highlighting and live reloading when you save. This is all you need for simple cases.
Let’s navigate Extensions tab and create our corridor automation extension by clicking green ➕ button.

You will then be prompted to give a name to the file. I recommend selecting a meaningful name so that it is easier to navigate between multiple files later on. In my case, I chose toggle-corridor-lights.js.

A template extension is inserted by default, which is useful as a starting point. It implements the same case for toggling lights on a smart button click. You can use this template or replace it with the one provided below to avoid making any mistakes.
class ToggleCorridorLightOnButtonClick {
    constructor(
        zigbee,
        mqtt,
        state,
        publishEntityState,
        eventBus,
        enableDisableExtension,
        restartCallback,
        addExtension,
        settings,
        logger,
    ) {
        this.zigbee = zigbee;
        this.mqtt = mqtt;
        this.state = state;
        this.publishEntityState = publishEntityState;
        this.eventBus = eventBus;
        this.enableDisableExtension = enableDisableExtension;
        this.restartCallback = restartCallback;
        this.addExtension = addExtension;
        this.settings = settings;
        this.logger = logger;

        this.logger.info('Loaded  ToggleCorridorLightOnButtonClick');
        this.mqttBaseTopic = this.settings.get().mqtt.base_topic;
    }

    /**
     * Called when the extension starts (on Zigbee2MQTT startup, or when the extension is saved at runtime)
     */
    start() {
        this.eventBus.onStateChange(this, this.onStateChange.bind(this));
    }

    /**
     * Called when the extension stops (on Zigbee2MQTT shutdown, or when the extension is saved/removed at runtime)
     */
    stop() {
        this.eventBus.removeListeners(this);
    }

    async onStateChange(data) {

        const { entity, update } = data;

        const myButtonIeeAddr = '0x54ef44100143de39'; // TODO: Replace with IEEE Address of your smart button
        const myLampIeeAddr = '0x94b216fffe8c23f2'; // TODO: Replace with IEEE Address of your smart switch

        // Corridor Light Button
        if (entity.ID === myButtonIeeAddr) {
            const action = update?.action;
            this.logger.info(`Corridor Button Action: ${action}`);
            // A single button click
            if (action === 'single') {


              this.logger.info(`Corridor Light Action: toggle`);
              this.mqtt.onMessage(`${this.mqttBaseTopic}/${myLampIeeAddr}/set`, JSON.stringify({ state: 'toggle' }));
            }
        }
    }
}

// eslint-disable-next-line no-undef
module.exports = ToggleCorridorLightOnButtonClick;
Before pressing Save, don’t forget to replace IEEE addresses of the lamp and smart button with one you noted before.
    const myButtonIeeAddr = '0x54ef44100143de39'; // <- Replace with IEEE Address of your smart button
    const myLampIeeAddr = '0x94b216fffe8c23f2'; // <- Replace with IEEE Address of your smart switch/lamp
And that’s all! The lights should now be triggered by clicking the button! That was easy, wasn’t it?
In case you encounter any problems, check out the Troubleshooting section.
Beyond Basic Toggles
If you’re comfortable with the basics, switching lights on with a button click can be a very simple use case. Here are some ideas for expanding your extension further.
Handle Multiple Button Actions
Most smart buttons support single-click, double-click, and long-press. Why not use them?
async onStateChange(data) {
    const { entity, update } = data;

    const myButtonIeeAddr = ...
    const myLampIeeAddr = ...

    if (entity.ID === myButtonIeeAddr) {
        const action = update?.action;

        if (action === 'single') {
            // Toggle on single click
            this.mqtt.onMessage(`${this.mqttBaseTopic}/${myLampIeeAddr}/set`,
                JSON.stringify({ state: 'toggle' }));
        } else if (action === 'double') {
            // Full brightness on double click
            this.mqtt.onMessage(`${this.mqttBaseTopic}/${myLampIeeAddr}/set`,
                JSON.stringify({ state: 'on', brightness: 254 }));
        } else if (action === 'hold') {
            // Dim to 50% on long press
            this.mqtt.onMessage(`${this.mqttBaseTopic}/${myLampIeeAddr}/set`,
                JSON.stringify({ state: 'on', brightness: 127 }));
        }
    }
}
Check Device State Before Acting
Perhaps you only want the corridor light to turn on when the motion sensor detects movement, as long as the illuminance is lower than 1000 lm:
async onStateChange(data) {
    const { entity, update } = data;

    const myMotionSensorIeeAddr = ...
    const myIlluminanceSensorAddr = ...
    const myLampIeeAddr = ...

    if (entity.ID === myMotionSensorIeeAddr) {

        if (update?.presence === 'true') {
            // Get the illuminance sensor's current state
            const illuminanceSensor = this.zigbee.resolveEntity(myIlluminanceSensorAddr);
            const illuminanceState = this.state.get(illuminanceSensor);

            // Only turn on if it is dark
            if (illuminanceState?.illuminance < 1000) {
                this.mqtt.onMessage(`${this.mqttBaseTopic}/${myLampIeeAddr}/set`,
                    JSON.stringify({ state: 'on' }));
            }
        } else if (update?.presence === 'false') {
            this.mqtt.onMessage(`${this.mqttBaseTopic}/${myLampIeeAddr}/set`,
                    JSON.stringify({ state: 'off' }));
        }
    }
}
Control Multiple Devices
One button, multiple lights—perfect for “all off” switches:
const livingRoomLights = [
    '0x001122334455aabb',
    '0x001122334455ccdd',
    '0x001122334455eeff'
];

async onStateChange(data) {
    const { entity, update } = data;

    if (entity.ID === myButtonIeeAddr && update?.action === 'single') {
        livingRoomLights.forEach(lampAddr => {
            this.mqtt.onMessage(`${this.mqttBaseTopic}/${lampAddr}/set`,
                JSON.stringify({ state: 'off' }));
        });
    }
}
Want to Learn More?
The extension file is just JavaScript with access to Zigbee2MQTT internals. You can:
- Access any device state using
this.state.get(entity). Please note that the parameter is a device object and not a device name or address. - Look up devices by IEEE Address with
this.zigbee.resolveEntity('0x000000000000') - Subscribe to other events like
this.eventBus.onMQTTMessage()orthis.eventBus.onDeviceMessage() - Use
this.logger.info(),this.logger.warn(), orthis.logger.error()for debugging
For the complete API and more advanced examples, check the official extension documentation or browse the Zigbee2MQTT source code.
Troubleshooting
Troubleshooting can be tricky if you are a beginner. However, following this step-by-step guide should help you identify the issue.
1. Extension loading
First of all, check if your extension is loaded. Every time you click Save you should see notifications that your extension is successfully reloaded.

If you see these messages, it means that the extension is loading correctly. Otherwise, red pop-ups containing an error description will appear. Look for error logs in the ‘Logs’ section, filtering by the filename of your extension.

Error messages during extension loading usually indicate syntax errors, such as missing } or ). If you can’t identify the issue, try dumping the entire contents of the file into the AI assistant of your choice, such as ChatGPT, Gemini or Microsoft Copilot.
Another possibility is that you cannot see any messages mentioning your extension. In this case, check whether your extension is located in the external_extensions directory and has .js file extension.
data/
  external_extensions/
    toggle-corridor-lights.js
  configuration.yml
2. Wrong IEEE Address
One of the most common mistakes is getting the addresses of the devices mixed up in the if conditions. Make sure you’re using the right one by comparing it with the one displayed on the device’s page.
3. Wrong device parameter name or value
Another common mistake is to pick the wrong parameter or its value. If you’re unsure which parameter in the update object you need, try to check what is reported in the State tab of the device page.

The update that we receive in the onStateChange() method is the difference between the new state and the previous state. Therefore, if we want to take action when a parameter crosses a threshold — for example, illuminance — we can do it like this:
if (update?.illuminance > 500) {
    // Turn on lights
}
To respond to any change of the parameter, simply remove the comparison part of the condition.
// State of a TV smart plug
if (update?.state) {
    // Update accordingly the state of the audio system
}
Note
The parameters or values of sensors, smart plugs or light bulbs from different vendors can differ. What works for one vendor or device may not work for another.
5. Continuous update loop
Changing the state of a device based on another change to the same device can cause a loop. In other words, your code will be triggered again and again in the onStateChange() method by your changes.
An advice here is to monitor logs for a while under different scenarios in order to understand that it works as expected.
4. Everything else
If you encounter any other issues, try tracking them down by temporarily logging any information that could help you understand the path your code follows. You could also consult AI assistants and ask for advice in online communities. Try to add the logic gradually to catch what exactly causes the issue.
Links
https://www.zigbee2mqtt.io/advanced/more/external_extensions.html
https://github.com/Koenkk/zigbee2mqtt
https://smarthomescene.com/guides/how-to-bind-zigbee-devices-directly-in-zigbee2mqtt/
https://medium.com/@omaslyuchenko/hello-zigbee-world-part-14-direct-binding-of-devices-ee352cc55b7
https://www.home-assistant.io/integrations/zha/#zigbee-groups-and-binding-devices